Showing posts with label October. Show all posts

Monday, August 30, 2010

CLASSY PRINTS - FINGERPRINTING


October is the month to celebrate Finger Printing and discussing why we do it.  Send the I.D. ME page home for parents to help their child fill out the information.  Have your students come to you to fingerprint them.  I used the stamp ink pad from my desk.The other students can be drawing a detailed picture of themselves and coloring it neatly. This is definitely a page that will go into the Journal/Memory Book after the students are finished reading the Class Book in the Quiet Corner.  Notice the cover is a picture made from finger tips.
See additional papers if you wish to extend the project: COMPREHENSION, SCIENCE INVESTIGATION, FUN ACTIVITIES from Copycat Press http://stores.ebay.com/Copycat-Store


BOOOOTIFUL STORIES


Start October off with some spooky writing.  Begin by brainstorming ideas of what could happen one scary night.  List the ideas on the board.  Some ideas could be spooky characters, scary places, horrific sounds... Students write a sloppy copy on lined paper and have it checked by the teacher.  They copy onto the writing page after fixing errors.  Color neatly when completed.  A nice touch during the actual writing time is a spooky sound audio tape playing softly in the background.  Before you put into a class book, you might put some on your website for parents to read.

Saturday, August 14, 2010

AIMS SCIENCE: FALL LEAFS ME HAPPY


Question: What can we find out about fall leaves?
Material: Worksheet, Leaves, Magnifier, Map Colored Pencils
Directions:
Measure 4 leaves - use inch measurement
Pick 1 leaf to look at closely with a magnifier.
Carefully draw the leaf, the veins...
Color with map pencils.
Write a paragraph on the leaf paper.
~ tell about leaves
~ what is the same about them
~ what is different about them
~ what can you say about the colors
~ what do you know about touching the leaves
~ what can you say about the shapes
~ how did the leaf look different under the magnifier


Thursday, December 31, 2009

Saturday, November 7, 2009

MILK JUG SKELETON

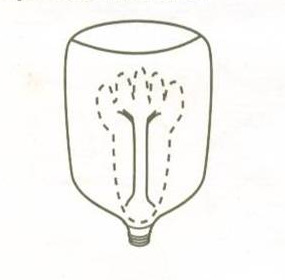
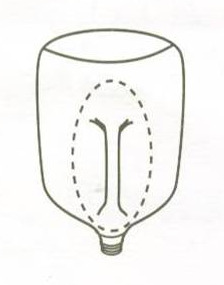
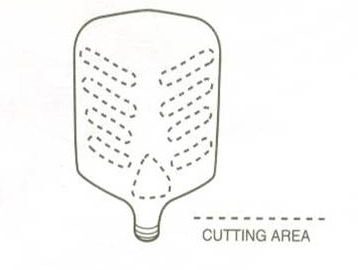
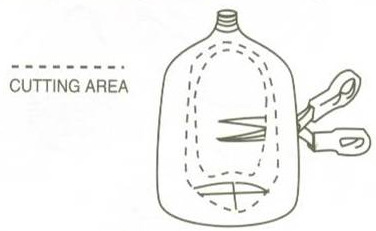
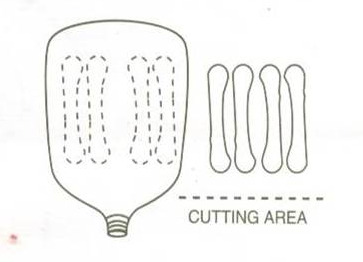
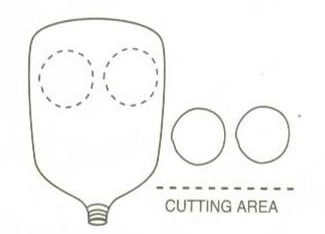
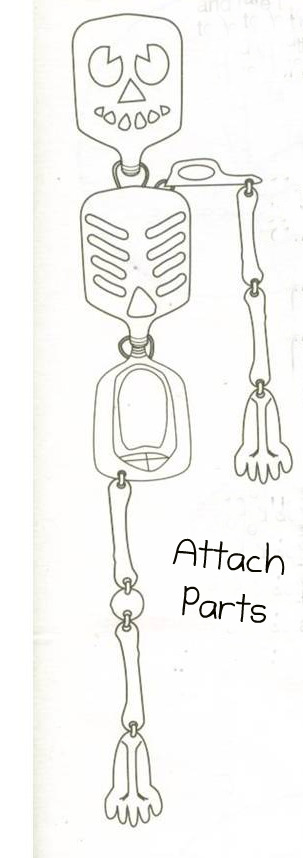
Want a way for your students to easily learn the names of the bones?  Make a Milk Jug Skeleton, label it, and hang it from your ceiling.  Notice how often the students go over and look at the hanging skeleton!  You will need someone with strong hands to help you cut out the plastic pieces.   Additional Activities:  Play Simon Says.  Have students learn the song "Dem Bones"  for reinforcement.  See a different version below.


.
Oh those bones, oh those bones,
oh those skeleton bones.
Oh those bones, oh those bones,
oh those skeleton bones.
Oh those bones, oh those bones,
oh those skeleton bones.
Oh mercy how they scare!

With the toe bone connected
to the foot bone,
and the foot bone connected
to the ankle bone,
and the ankle bone connected
to the leg bone.
Oh mercy how they scare!

Oh those bones, oh those bones, 
oh those skeleton bones.
Oh those bones, oh those bones,
oh those skeleton bones.
Oh those bones, oh those bones,
oh those skeleton bones.
Oh mercy how they scare!

With the leg bone connected
to the knee bone,
and the knee bone connected
to the thigh bone,
and the thigh bone connected 
to the hip bone.
Oh mercy how they scare!

Oh those bones, oh those bones,
oh those skeleton bones.
Oh those bones, oh those bones,
oh those skeleton bones.
Oh those bones, oh those bones,
oh those skeleton bones.
Oh mercy how they scare!

With the hip bone connected
to the back bone,
and the back bone connected
to the neck bone,
and the neck bone connected
to the head bone,
Oh mercy how they scare!

Oh those bones, oh those bones,
oh those skeleton bones.
Oh those bones, oh those bones,
oh those skeleton bones.
Oh those bones, oh those bones,
oh those skeleton bones.
Oh mercy how they scare!

With the finger bone connected
to the hand bone,
and the hand bone connected
to the arm bone,
and the arm bone connected
to the shoulder bone,
Oh mercy how they scare!

Oh those bones, oh those bones,
oh those skeleton bones.
Oh those bones, oh those bones,
oh those skeleton bones.
Oh those bones, oh those bones,
oh those skeleton bones.
Oh mercy how they scare!

With the shoulder bone connected
to the back bone,
and the back bone connected
to the neck bone,
and the neck bone connected
to the head bone.
Oh mercy how they scare!


http://www.thepartyanimal-blog.org/milk-jug-skeleton-fun-recycled-craft-decoration-halloween/

Here is what you will need to Create your Milk Jug Skeleton:
  • 7 Clean and Dry Gallon Milk Jugs
  • Wax Pencil or Crayon
  • Craft Snips or Scissors
  • String or Fishing Line for Hanging
  • Approx. 40 Yds of String or Yard to Ties all the parts together
  • Glow in the Dark Paint
  • Paint Brush
  • Hole Punch
Take 4 of the Plastic Jugs and Cut Out your Hands and Feet at the Handle. 2 of Each. Punch a Hole in the end of each.
Next take 2 More of the Plastic Jugs and cut out Shoulder at the Handle. At the Top of the Jug Side Punch 1 Hole and Two at the other side.
Now Take one of the Plastic Jugs and Draw a Skeleton Face on it and Cut it out. Then Punch a Hole in the Bottom at the opening on each side.
Then Draw on some Ribs on one of the Milk Jugs and Cut them out. Make a Hole in the Bottom of the Jug and Punch a Hole in each side of the Opening.
To make the Hips draw on a large area you want to cut out. Cut the same one out on both sides so you can see through it. Punch Two Holes at the Jug Opening and one on Each Side on the Front of the Jug where the Legs will hang from.
Now Cut 4 Long Bones for Arms from one Plastic Jug and 4 Long Bones for Legs from another. Punch a Hole in each end of all of them.
Cut out 2 Knees from a Plastic Jug and punch a Hole on each end.
Now before you attach it all together you can take your Glow in the Dark Paint and paint all the pieces. You can use the Glow in the Dark Dimensional Paint and make fun designs like the one in the photo. You can even add different colors if you wish to add to the fun. Just have fun with it. I remember when I did mine I took a Black Marker and outlined all the pieces to make it really pop.
Now Cut about 16 Pieces of String and Tie all the pieces of your Skeleton together.
Another site.
http://familyfun.go.com/crafts/mr-bottle-bones-665134/

Friday, October 23, 2009

SKELETON DRESS UP


FIRE SAFETY COLOR BY NUMBER


FIRE SAFETY CAN


Take empty vegetable can - make sure there are no sharp edges.  Try to find plastic lids that will fit the cans.  Students decorate worksheet.  Send home to have emergency numbers filled out by parents.  When student brings it back, glue paper onto can.  Once it is home, parents can fill it with baking soda and put by the stove.  Taken from Frank Schaffer.

FIRE FIGHTER'S HAT


Taken from COPYCAT PRESS - (out of print)

WITCHES' BREW OVERHEAD ACTIVITY

                                                                                                                                                                     Exciting Halloween Project.  Listen to the song  until the students are singing along.  Get out the overhead machine and do the activity.  Brainstorm some items that can go into a brew.  Discuss ways to mix a brew.   Write and Proof.  Hand out paper for students to make a neat 'final copy'.  Color.  Find a witch to post in the hallway with the caldron.  Place student writing all around. Listen to your students hum and sing the song everytime they pass the display.  Put the student writing in Journal/Memory book when you take down.


GO TO THIS SITE TO LISTEN TO SONG:
http://www.imeem.com/alec7/music/3PxmjXGV/hap-palmer-witches-brew/  

Action:
"Dead leaves, seaweed..."
Children pretend to throw ingredients in a cauldron.
"Stir them in my witches' brew." Children do stirring motion.
"I got magic, Alakazamakazoo." Children pretend to cast spell using any hand movements they feel are appropriate.
"Boo!" Make a sudden scary movement.

ALTERNATIVE BREW