Lots of projects, actvities, and ideas. DOUBLE CLICK TO GET LARGE VIEW OR PRINT. Comments are welcome.
Tuesday, November 24, 2009
SEASONAL CINQUAIN AND FINGERPRINT ART
A TWO PART PROJECT...Students make a picture using their finderprints as the basis. After the Art Project is completed, introduce the Writing component. Students think about their art project and write a cinquain that enhances the picture. For fun have students write on black lined paper with gel pens. Post in the hallway.
CUPCAKE LINER OWL
LARGE ART PROJECT FOR LITTLE ONES THAT BECOMES 3D.
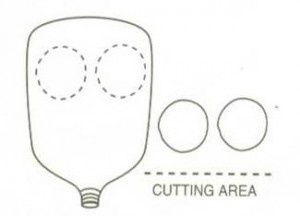
Make patters for students to trace. Students cut out the owl body, nose, feet, black circle and pupil for eyes. Each student gets 2 cupcake liners to make the eyes. Glue.
Make patters for students to trace. Students cut out the owl body, nose, feet, black circle and pupil for eyes. Each student gets 2 cupcake liners to make the eyes. Glue.
WE GIVE THANKS BULLETIN BOARD
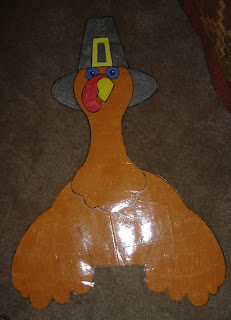

 Display thankful thoughts written by your students. Make a turkey body. Laminate it so it can be used every year. This is the center of your Thankful Thought Bulletin Board. It actually is in 2 sections. The neck overlaps onto the body. I colored it with chalk and then laminated it. It has kept its bight, bold colors for years. Now for the student part of the board... Give each student a feather copied onto colored paper. Students fill in the feather with a list of "thank-yous". These feathers are tucked behind the turkey to finish your Board. When you take the board down, put the feathers in the Journal/Memory Book. The Language Arts Concept I focused on was 'things in a series' and where the commas went. Enjoy reading all the THANKFUL THOUGHTS.
ADVENT PRAYER CHAIN
Finding ways to encourage children to put "Faith Thoughts" in their minds during the day has just become easy. Try using this ADVENT PRAYER CHAIN.
Type the list below. Make sure each sentence has its own line. Copy the sheet on pink or purple paper-enough for each child to have a set. Have the students cut the prayer strips. The students can paste, glue, or staple each strip inside a previous strip. At the end each day, the students take a strip from their chain and focus on that thought. You can send this project home for students to do with parents or make a larger one to be used in class.
Type the list below. Make sure each sentence has its own line. Copy the sheet on pink or purple paper-enough for each child to have a set. Have the students cut the prayer strips. The students can paste, glue, or staple each strip inside a previous strip. At the end each day, the students take a strip from their chain and focus on that thought. You can send this project home for students to do with parents or make a larger one to be used in class.
Jesus, I offer you everything I do today.
God, may I give glory to you by the way I live my life.
Jesus, help me to live in faith, hope, and love throughout the year.
Father, help me to remember that you love me with an unending love.
Jesus, help me to stand up for the rights of others.
Jesus, teach me to help others, as did St. Nicholas.
Lord, help me to live as a person of hope.
Father, I pray for all those who are sick.
Spirit of God, be with me in all that I do.
Lord Jesus, may I see you in all the people I meet.
Jesus, help me to care about others during Advent.
God, help me to get ready in my heart to celebrate Christmas.
Lord, help me to live in peace with others.
Lord, may I be a joyful person during Advent.
Father, I pray today for all those who are hungry in our world.
God, help me to open my heart and my life to people in need.
God, help me to say yes in my life as Mary did in hers.
Father, thank you for the gift of Christmas.
Holy Spirit, fill my heart with love for others.
Lord, forgive me for the times I have hurt you and others.
Father, help me have faith in your goodness and love.
Dear Lord, help me to live as a person of your light.
Father, may I see Advent as a time of new beginning.
Father, help me to share your love with others.
Saturday, November 7, 2009
TURKEY FINGER PUPPETS
MILK JUG SKELETON
 Want a way for your students to easily learn the names of the bones? Make a Milk Jug Skeleton, label it, and hang it from your ceiling. Notice how often the students go over and look at the hanging skeleton! You will need someone with strong hands to help you cut out the plastic pieces. Additional Activities: Play Simon Says. Have students learn the song "Dem Bones" for reinforcement. See a different version below.
 .
.Oh those bones, oh those bones,
oh those skeleton bones.
Oh those bones, oh those bones,
oh those skeleton bones.
Oh those bones, oh those bones,
oh those skeleton bones.
Oh mercy how they scare!
With the toe bone connected
to the foot bone,
and the foot bone connected
to the ankle bone,
and the ankle bone connected
to the leg bone.
Oh mercy how they scare!
Oh those bones, oh those bones,
oh those skeleton bones.
Oh those bones, oh those bones,
oh those skeleton bones.
Oh those bones, oh those bones,
oh those skeleton bones.
Oh mercy how they scare!
With the leg bone connected
to the knee bone,
and the knee bone connected
to the thigh bone,
and the thigh bone connected
to the hip bone.
Oh mercy how they scare!
Oh those bones, oh those bones,
oh those skeleton bones.
Oh those bones, oh those bones,
oh those skeleton bones.
Oh those bones, oh those bones,
oh those skeleton bones.
Oh mercy how they scare!
With the hip bone connected
to the back bone,
and the back bone connected
to the neck bone,
and the neck bone connected
to the head bone,
Oh mercy how they scare!
Oh those bones, oh those bones,
oh those skeleton bones.
Oh those bones, oh those bones,
oh those skeleton bones.
Oh those bones, oh those bones,
oh those skeleton bones.
Oh mercy how they scare!
With the finger bone connected
to the hand bone,
and the hand bone connected
to the arm bone,
and the arm bone connected
to the shoulder bone,
Oh mercy how they scare!
Oh those bones, oh those bones,
oh those skeleton bones.
Oh those bones, oh those bones,
oh those skeleton bones.
Oh those bones, oh those bones,
oh those skeleton bones.
Oh mercy how they scare!
With the shoulder bone connected
to the back bone,
and the back bone connected
to the neck bone,
and the neck bone connected
to the head bone.Oh mercy how they scare!
http://www.thepartyanimal-blog.org/milk-jug-skeleton-fun-recycled-craft-decoration-halloween/
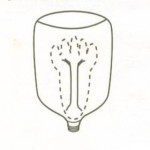 Take 4 of the Plastic Jugs and Cut Out your Hands and Feet at the Handle. 2 of Each. Punch a Hole in the end of each.
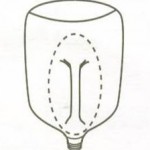 Next take 2 More of the Plastic Jugs and cut out Shoulder at the Handle. At the Top of the Jug Side Punch 1 Hole and Two at the other side.
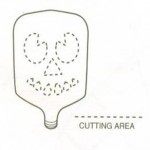 Now Take one of the Plastic Jugs and Draw a Skeleton Face on it and Cut it out. Then Punch a Hole in the Bottom at the opening on each side.
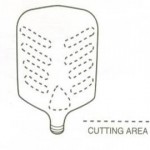 Then Draw on some Ribs on one of the Milk Jugs and Cut them out. Make a Hole in the Bottom of the Jug and Punch a Hole in each side of the Opening.
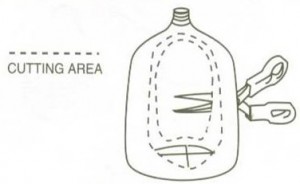 To make the Hips draw on a large area you want to cut out. Cut the same one out on both sides so you can see through it. Punch Two Holes at the Jug Opening and one on Each Side on the Front of the Jug where the Legs will hang from.
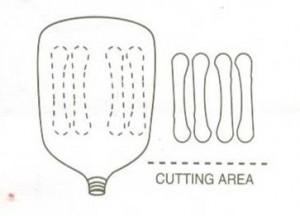 Now Cut 4 Long Bones for Arms from one Plastic Jug and 4 Long Bones for Legs from another. Punch a Hole in each end of all of them.
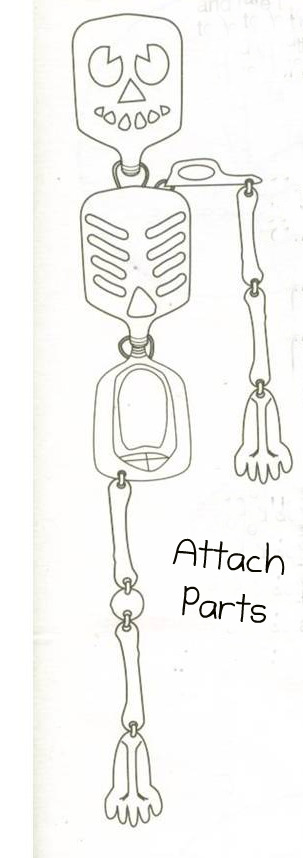 Now Cut about 16 Pieces of String and Tie all the pieces of your Skeleton together.
Another site.
http://familyfun.go.com/crafts/mr-bottle-bones-665134/
Oh those bones, oh those bones,
oh those skeleton bones.
Oh those bones, oh those bones,
oh those skeleton bones.
Oh mercy how they scare!
With the toe bone connected
to the foot bone,
and the foot bone connected
to the ankle bone,
and the ankle bone connected
to the leg bone.
Oh mercy how they scare!
Oh those bones, oh those bones,
oh those skeleton bones.
Oh those bones, oh those bones,
oh those skeleton bones.
Oh those bones, oh those bones,
oh those skeleton bones.
Oh mercy how they scare!
With the leg bone connected
to the knee bone,
and the knee bone connected
to the thigh bone,
and the thigh bone connected
to the hip bone.
Oh mercy how they scare!
Oh those bones, oh those bones,
oh those skeleton bones.
Oh those bones, oh those bones,
oh those skeleton bones.
Oh those bones, oh those bones,
oh those skeleton bones.
Oh mercy how they scare!
With the hip bone connected
to the back bone,
and the back bone connected
to the neck bone,
and the neck bone connected
to the head bone,
Oh mercy how they scare!
Oh those bones, oh those bones,
oh those skeleton bones.
Oh those bones, oh those bones,
oh those skeleton bones.
Oh those bones, oh those bones,
oh those skeleton bones.
Oh mercy how they scare!
With the finger bone connected
to the hand bone,
and the hand bone connected
to the arm bone,
and the arm bone connected
to the shoulder bone,
Oh mercy how they scare!
Oh those bones, oh those bones,
oh those skeleton bones.
Oh those bones, oh those bones,
oh those skeleton bones.
Oh those bones, oh those bones,
oh those skeleton bones.
Oh mercy how they scare!
With the shoulder bone connected
to the back bone,
and the back bone connected
to the neck bone,
and the neck bone connected
to the head bone.Oh mercy how they scare!
http://www.thepartyanimal-blog.org/milk-jug-skeleton-fun-recycled-craft-decoration-halloween/
Here is what you will need to Create your Milk Jug Skeleton:
- 7 Clean and Dry Gallon Milk Jugs
- Wax Pencil or Crayon
- Craft Snips or Scissors
- String or Fishing Line for Hanging
- Approx. 40 Yds of String or Yard to Ties all the parts together
- Glow in the Dark Paint
- Paint Brush
- Hole Punch
 Take 4 of the Plastic Jugs and Cut Out your Hands and Feet at the Handle. 2 of Each. Punch a Hole in the end of each.
 Next take 2 More of the Plastic Jugs and cut out Shoulder at the Handle. At the Top of the Jug Side Punch 1 Hole and Two at the other side.
 Now Take one of the Plastic Jugs and Draw a Skeleton Face on it and Cut it out. Then Punch a Hole in the Bottom at the opening on each side.
 Then Draw on some Ribs on one of the Milk Jugs and Cut them out. Make a Hole in the Bottom of the Jug and Punch a Hole in each side of the Opening.
 To make the Hips draw on a large area you want to cut out. Cut the same one out on both sides so you can see through it. Punch Two Holes at the Jug Opening and one on Each Side on the Front of the Jug where the Legs will hang from.
 Now Cut 4 Long Bones for Arms from one Plastic Jug and 4 Long Bones for Legs from another. Punch a Hole in each end of all of them.
Now before you attach it all together you can take your Glow in the Dark Paint and paint all the pieces. You can use the Glow in the Dark Dimensional Paint and make fun designs like the one in the photo. You can even add different colors if you wish to add to the fun. Just have fun with it. I remember when I did mine I took a Black Marker and outlined all the pieces to make it really pop.
 Now Cut about 16 Pieces of String and Tie all the pieces of your Skeleton together.
Another site.
http://familyfun.go.com/crafts/mr-bottle-bones-665134/


